Pages

Sunday, June 19, 2011

Remember These TV Dads?.....

"Dad"  was always looked to in high regard..........


.............as a best friend


.........adviser, teacher


..............problem solver


.........there was always a moral to the story


..........Dad could fix anything, or

........make it "all better"


"Dad" was always a good role model for his family,
keeping high values, 
taking pride in doing whatever necessary
 to provide for their safety,
happiness and well being.


Blessings to all Dads on this Father's Day!

Sunday, June 5, 2011

A Music Page Feather and a Canvas Painting

I've been wanting to make a music page feather for some time now after seeing Karen's tutorial at Todolwen here . 


 And here is the result.
 I love it next to my little bird nest themed cloche.


Or maybe beside my little birds nest canvas painting.


Hmmmm,  I'm off to make some more.......... 


Hugs,


Saturday, May 28, 2011

The Pot of Geraniums

(this photo from Sunny Side of the Porch)
Today I'm Featuring two Bloggers I know you will enjoy visiting:
*
Sunny Side of the Sun Porch, here
see additional red/geranium tablescape photos in her older post, here http://sunnysideofthesunporch.blogspot.com/2010/06/geraniums.html
*
and NanniePannie's Blog, here,
*
I was visiting over at NanniePannie's and her recent post reminded me of a favorite short story from my childhood about the Geranium.
*
I was so very happy to find the story posted at Geraniums Online and just had to share it with you. Click here to read http://www.geraniumsonline.com/culture7.htm

Saturday, May 21, 2011

My Hummingbirds are Back !!!

I've come to realize that the first part of May is when the hummingbirds return for the summer. They hover and look in my kitchen window as if to say "I'm back, where's the feeder". I hadn't seen any yet this year, but last week I made some nectar and hung the feeder out my kitchen window, and as I was doing so I noticed a ruby throated hummingbird patiently waiting on a nearby tree branch.
My Nectar Recipe is as follows:
1 cup white granulated sugar
3 cups water
Boil for 2 minutes in saucepan on stovetop. Cool.
You may refrigerate extra until you need to refill the feeder.
Dying the nectar is NOT necessary. Hummingbirds seem to be attracted to the color red and most feeders are red I assume for this reason. But I know of no health benefits for the birds to ingest food dyes.
It's such a treat to see two or three buzzing about my feeder.
I recently was directed to this site and just had to share it with you.
Hope you enjoy!
Hugs,

Thursday, April 28, 2011

May Baskets Tutorial

Hi All.......I know it's been FOREVER since I've posted, thank you for not deleting yourselves from my Followers list. LOL I've been assigned full-time work for several months again. I don't know how you all do it.....work and family...... I admire you all so!!! It seems there isn't enough hours in the day to do all the things I want to do.

I can't believe May is just around the corner. It's still cold, gray and windy here with a threat of frost this evening and some say there was a bit of ice and a few slushy snowflakes mixed with today's rain.
Although it may be cloudy outside, maybe a May Basket will bring a little sunshine to someone you know.


I started with a paper doily from a Dollar Store.


Make a circle out of poster board about 2 inches larger in diameter than the doily
My doilies were 8 inches across. I used a 10 inch salad plate which will be one inch larger than the doily all the way around.


Next I cut a decorative edge.


It helps to pre-fold your posterboard and the doily in half.


Apply glue, I love using the Elmers Glue sticks for these paper projects .

Secure the doily to the posterboard.

Unfold, then refold along the same crease only this time fold so the doily is on the inside.


Next,Punch a hole approx. 2 inches from the folded edge on both ends.


Unfold again, find the centerpoint of the crease, bringing the creased edges together


and overlap...........


Line up the holes..........


and secure with a staple.


Now it should look like two cones .......or tussy mussy twins, haha


Or, it could look like this with a square bottom.


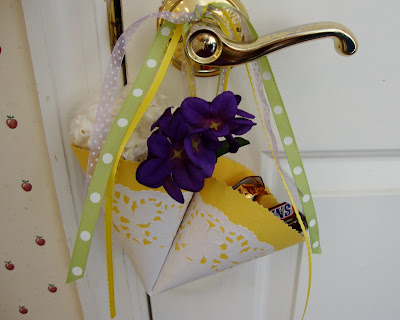
Thread ribbons or lace or combination through the hole and tie to secure. Be sure to leave enough length to hang on a door knob, tie a bow or knot and I like to leave long trailing tails.

(sorry, I don't know how this got underlined...I can't get rid of it!!)


Next fill your May Baskets with flowers and goodies.
Growing up, we always picked dandelions and violets from the lawn to put in our May Baskets.

Really you can use whatever you may have in your garden.


Just 3 or 4 small stems is all it takes to dress up the basket. I wrap a wet piece of paper towel around the cut ends of the stems and then a small piece of plastic wrap and secure with a twist tie to keep the little bouquet fresher awhile longer.


Of course artificial flowers are always an option.


Then my Mom would pop corn,.......... today it's from a bag,


and her homemade Fudge has given way to Dollar Store junior candy bars.


I tuck them in a little paper shreds left over from the Easter Baskets!!


I made a couple dozen of these last year in a variety of colors and distributed to the ladies at work..........it makes me smile when I visit their offices and see some still have their May Basket hanging on their doorknob or pinned up on their cubicle wall!


Friday, March 25, 2011

The Easter Dachshund

You've heard of the Peanuts character Charlie Brown
and his dog Snoopy as
the Easter Beagle??
Well,
we
have
an Easter Dachshund :D
She celebrated a little early this year........


Looking rather guilty.........
Yes, caught in the act.
I must admit it was my fault for leaving my purse on the floor
with the zipper open.
The temptation proved to be too much for her to resist.
She stuck her head in,
rooted around
and helped herself to bag of MM Peanuts that I'd tucked in,
as I most always have some sort a little pick me up at hand (fruit, nuts, 100 calorie packs, etc.) to munch on while driving, shopping or at my desk at work.
She sniffed them out
and took them back to her
"nest".


She's very tidy
and even took a packet a Kleenex
to wipe her paws!


Silly Millie, No Chocolate for Dachshunds!


Read more about Millie on my sidebar.
Don't deny yourself the pleasure of listening to
Peter Himmelman's Dixie the Dashchund song.
Just click on Millie's sidebar photo.
I simply cannot listen to that song too many times.
I love it. It makes me smile and sometime
I laugh myself to tears as I envision the lyrics.

Warm Hugs,

Tuesday, March 15, 2011

Blarney Cakes for St. Patrick's Day


A favorite sweet and salty treat

eaten at St. Patricks Day...... Blarney Stones

White Cake coated with Peanuts,


Here's how I make mine:


I start with a Betty Crocker White Cake Mix

Follow the box directions with the following exception:

The box directions are to add 1 1/4 cups water

I instead add 1 cup water and 1/4 cup milk

Also 1/2 tsp. mild vanilla extract


Bake in a jelly roll pan 11 x 15 inches


When cool, cut into single serving size pieces

I first thought a bar shape like a Twinkie,


But later decided on square.


Frosting ingredients:


32 ounce bag powdered/confectioners sugar
1/2 - 3/4 cup milk
1 cup Crisco White Solid shortening
1/2 teaspoon Clear Imitation Vanilla
1/4 teaspoon Almond flavoring


Combine with stand mixer 'til well blended and smooth
Blend in a few drops of green food coloring, if desired


I found it was easiest to use a piping bag
with a straight or rose tip to apply frosting

Pipe around all 4 sides, then the top.


Using a large spoon, such as a soup or serving spoon,
scoop up finely ground peanuts and
press against sides and top of cake
to coat well.


Grinding the peanuts is a breeze with my Magic Bullet.


To dress up my Blarneys a bit


I made cupcake picks

with these foil stickers I found at a Dollar store.


There were four sheets in the package

each with larger and smaller sized shamrock stickers.


I just peeled one off and applied to a toothpick


Then lined one up on the opposite side

so they stuck together

sandwiching the toothpick inside.


Then just insert into the cake.

Easy, Inexpensive and Cute!


Enjoy!