 Hi All.......I know it's been FOREVER since I've posted, thank you for not deleting yourselves from my Followers list. LOL I've been assigned full-time work for several months again. I don't know how you all do it.....work and family...... I admire you all so!!! It seems there isn't enough hours in the day to do all the things I want to do.
I can't believe May is just around the corner. It's still cold, gray and windy here with a threat of frost this evening and some say there was a bit of ice and a few slushy snowflakes mixed with today's rain.
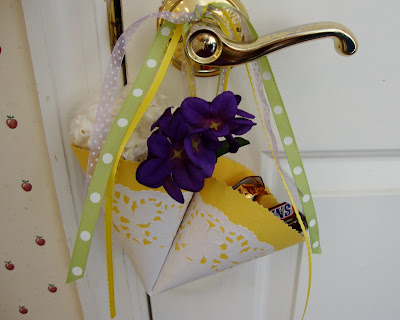
Although it may be cloudy outside, maybe a May Basket will bring a little sunshine to someone you know.
I started with a paper doily from a Dollar Store.

Make a circle out of poster board about 2 inches larger in diameter than the doily
My doilies were 8 inches across. I used a 10 inch salad plate which will be one inch larger than the doily all the way around.
My doilies were 8 inches across. I used a 10 inch salad plate which will be one inch larger than the doily all the way around.

Next I cut a decorative edge.

It helps to pre-fold your posterboard and the doily in half.

Apply glue, I love using the Elmers Glue sticks for these paper projects .

Secure the doily to the posterboard.

Unfold, then refold along the same crease only this time fold so the doily is on the inside.
Next,Punch a hole approx. 2 inches from the folded edge on both ends.

Unfold again, find the centerpoint of the crease, bringing the creased edges together

and overlap...........

Line up the holes..........

and secure with a staple.

Now it should look like two cones .......or tussy mussy twins, haha

Or, it could look like this with a square bottom.
 Thread ribbons or lace or combination through the hole and tie to secure. Be sure to leave enough length to hang on a door knob, tie a bow or knot and I like to leave long trailing tails.
(sorry, I don't know how this got underlined...I can't get rid of it!!)

Next fill your May Baskets with flowers and goodies.
Growing up, we always picked dandelions and violets from the lawn to put in our May Baskets.
Really you can use whatever you may have in your garden.
Just 3 or 4 small stems is all it takes to dress up the basket. I wrap a wet piece of paper towel around the cut ends of the stems and then a small piece of plastic wrap and secure with a twist tie to keep the little bouquet fresher awhile longer.

Of course artificial flowers are always an option.

Then my Mom would pop corn,.......... today it's from a bag,

and her homemade Fudge has given way to Dollar Store junior candy bars.

I tuck them in a little paper shreds left over from the Easter Baskets!!

I made a couple dozen of these last year in a variety of colors and distributed to the ladies at work..........it makes me smile when I visit their offices and see some still have their May Basket hanging on their doorknob or pinned up on their cubicle wall!


Happy May Day Everyone!!!!!!!!!!!
I'm sharing at these parties:
Inspiration Board Creative Party
Show Off your Stuff Party at Fireflies and Jellybeans
Inspiration Board Creative Party
Show Off your Stuff Party at Fireflies and Jellybeans


I have never seen the double basket. I love it! Very, very cute.
ReplyDeleteWelcome back Betty Jean! What a lovely idea, and I love that it is a double basket. Very sweet.
ReplyDeleteDarling idea! My youngest son is a May Day baby and born 5/1/81 (he hits the big 3-0 this year) (dang--what happened here)--anywho--love your basksets; pretty! Patty
ReplyDeleteThese May baskets are so cute. Wonderful idea! I wanted to make one this year, but was so busy and completely lost track of time. Then I realized it's the first of May already.
ReplyDeleteHappy May day!
These May Baskets are so pretty Betty Jean...thanks for the tutorial on how you made them :)
ReplyDeleteHope you have a great day...
Big hugs,
Queenie
Hi Betty...
ReplyDeleteso cute project... I am sure it can be a decorative and will be very favourite to kids for their goddies... Thanks for sharing ...
Hope you like to visit and love to feel the beauty and fragrance of flowers at
http://craftaworld.blogspot.com/
Love
Farah