Pages

Wednesday, October 20, 2010

Pumpkin Squares, Just Right for a Fall Tea Party

Favorite Pumpkin Squares

4 eggs
1 & 2/3 cup granulated sugar
16 oz. canned pumpkin
1 cup vegetable oil such as canola
2 cups flour
2 teaspoons baking powder
2 teaspoons ground cinnamon
1 teaspoon baking soda
1 teaspoon salt
1 cup chopped walnuts, optional- I instead chose to sprinkle a few on top

Cream the eggs and sugar, then add the oil and pumpkin. Beat 'til fluffy.
Sift together the remaining ingredients except for walnuts. Add to creamed ingredients and mix thoroughly.

Spread in an ungreased 15"x 10"x 1" baking pan.

Bake at 350 degrees for approximately 25 - 30 minutes. Or until pick inserted
in center comes out clean. Cool completely before frosting.
 

Cream Cheese Frosting:

4 ounces (1/2 brick) Philadelphia Cream Cheese
1/2 cup (1 stick) butter
1 teaspoon good vanilla extract/flavoring
2 cups powdered sugar or enough to make a good spreading consistency.

Beat together ingredients in order given. Spread over bars.


Enjoy!

Refrigerate any leftovers to enjoy later.

Saturday, October 16, 2010

Owl Bag Topper Tutorial

If you're looking for cute packaging for Fall gift giving, cookies, popcorn balls, etc. Look no further.
I've seen owl bag toppers attached to plastic sandwich type bags.
My version uses a brown paper lunch bag! This is a nice size for bigger portions.
An appealing way to package your goods if you're participating in a Fall Bazaar, etc.
Here's how......


I'm using white paper here just so it shows up better, but you'll want to use brown or black construction paper. Fold and cut in half lengthwise. You will only use one half sheet for each owl head. This should be about the same width as a paper lunch bag.


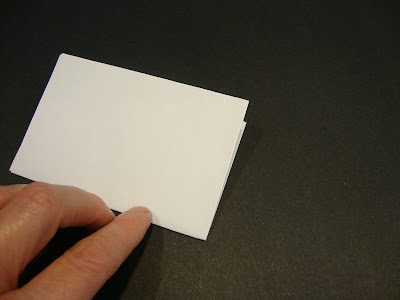
Then fold it top to bottom and then side to side like a greeting card.


Now cut curves as shown on the open sides,
leaving the folded sides uncut.


Then when you open it you have the basic head or face of the owl.
It is still folded at the top.


Fold the top of a lunch bag over approx. 2 - 3 inches and line up the folds of the bag and the owl head.
Glue into place.


It should look like this with a front and back head and the bag is still able to open.


Next you want to cut several pairs of circles. If you don't have a template, just look around the kitchen for things you can trace around like little lids, measuring cups, etc.

You will need:

2 circles cut from black construction paper 4cm dia. for the center of the eye
2 circles cut from white construction paper 5cm dia. white around center of the eye
2 circles cut from light brown or orange 6 1/2cm dia. for the outer eye
1 circle cut from dark brown 5cm dia.
this circle you then fold in half then cut the folded side with a slight curve for 2 eyelids


The eyes with the light brown outer edge looks like this.........


The eyes with the orange outer edges look like this..........


The eyelids add alot of personality.........


I saw another version where the outer eye cirles were cut scalloped and that was very cute, but I just snipped around here before adding the eyelids to make them a little ruffled looking.


Fold over a little bit of orange construction paper and cut a beak shape, then glue into place.
An open beak adds more personality.


Try folding it at an angle before gluing.


Hint: Another way you can add personality is when you glue the head to the bag, fold the top of the bag slightly uneven and this will make your owl look like it has it's head tilted.


Finally, I added little three-toed feet to my bag.........


I think he turned out pretty cute.
His head is actually a darker brown than the lunch bag body but this contrast doesn't show up very well in my pics. :o(


Now just fill with goodies!

I can't help thinking the face would be so adorable made out of felt and used as an applique, or, made into a child's purse or something along those lines.


Hugs,

Saturday, October 2, 2010

My Halloween Canvas Paintings


So glad you could join me for another Tea Party!
 
In the spirit of the
Halloween time of year that is upon us,
I'd like to show you some canvases that I painted a couple of years ago. 
I've also used sheet music pages, art paper and glitter. 
Click to enlarge for a closer look.
 
Sunny and Hunny Go Trick or Treating


Pumpkin Queen


Little Witch
 
 
decoupaged newsprint around canvas edges
 
 
Witch and Cat Chit-Chat


art paper edges


I hope you've enjoyed looking as much as I enjoyed painting them,

Happy Halloween!


Sunday, September 12, 2010

Annual Art Show Mosaic


Fall is my favorite season and one of the things I look forward to is all of the annual Fall harvest festivals and arts and crafts shows. This weekend was a local annual art show which showcased many talents ranging from watercolor painting to pottery making, jewelry making, wood carving and on and on.

Saturday, September 4, 2010

Fall Craft Show


It's a perfect day for a walk through a craft show..........The heat and humidity that has dominated the summer has given way to fall-like weather this morning with a brisk breeze and a nip in the air as temperatures hover in the high 60s/low 70s. Walk with me.........


I really like this red painted shutter with the center cut away, used as a frame for a cute espresso image. The rusty vintage style hook would be a great place to hang an apron or kitchen towel...........


There's the usual little painted wood pieces........


Fall leaves, pumpkins and scarecrows aplenty............


Handmade quilts..........


Hardware cloth/screen pumpkin candle cover.........


Candy corn tussy mussy fall arrangement..........


Happy Fall Y'all !!!!!!!!!!!!!!

Saturday, August 7, 2010

DIY Cupcake Wrappers

Have you seen all the pretty cupcake wrappers available now? I've seen them online but not in my local stores. I was recently asked to donate cupcakes for an event. I wanted to dress them up and was remembering those pretty cupcake wrappers. With no time to place an order, maybe I could make my own. I considered cutting scrapbooking paper but didn't want to buy scissors that cut a fancy edge. Then it hit me....I had some paper doilies.

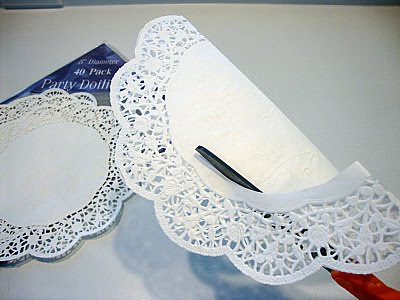
This package of 40 came from a Dollar Store!

I just folded it in half, then cut out the center.


Cut along the fold on either side.


Wrapped it around and secured with a bit of tape.


The request was for Strawberry Flavored Cakes. At first it was to be a sheet cake and there was brief mention of pistachio filling. So when the order was changed to cupcakes, I decided to sprinkle some crushed pistachios on top. The green was a pretty contrast to the pink frosting and the salty, crunchy nuts were a nice compliment to the strawberry flavored cake/frosting.
[Lesson learned--some nuts, particularly pistachios, sitting overnight on frosting will absorb some of the shortening from the frosting and become somewhat soggy/chewy :( ]


Then I topped them off with a fresh strawberry sliced in half.
I was very happy with the result but may experiment with a 10" doily next time. The curvature on the 8" doily caused it to flare away from the cake. Maybe the larger 10" will stand straighter making a tighter fit.
Very Easy way to give your cupcake a Gourmet Makeover. Looks so good it even tastes better. LOL. Give it a try and let me know how yours turns out!