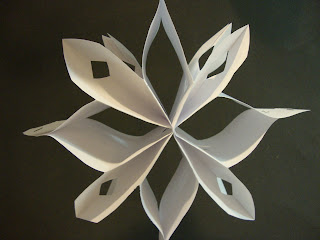
Who doesn't have fond childhood memories of cutting paper snowflakes.
The girls at work yesterday were busy making more "grown-up" snowflakes like these to hang in the doctors' office hallways and waiting area.
Their snowflakes reminded me of the large flowers made from colored paper lunch bags I'd seen earlier this summer at the Martha Stewart site here.
I couldn't resist putting My twist on it, and came up with this (mine is much smaller using only 2 sheets of paper instead of 6).........
Here's how:
Use 2 regular 8 1/2"x 11" sheets of copy paper, following Steps 1 - 7 for both sheets.
Step 1. Fold in half to within 1/2 inch or less. Fold this over and secure the "seam" with an Elmers glue stick or tape down across the full width of the page.
Step 2. On the non-taped side fold and crease 1 inch from Fold #1, flatten the paper and make a crease on the opposite side as well.
Step 3. Make a third crease positioning the paper so that Fold #1 is in the center of Folds 2 and 3, then reverse-fold Fold #1 to the inside as shows in Step 4. (This should look like a paper lunch bag with the bottom cut off as in Martha's flower directions.)
Step 5. Fold in half as shown in Step 5 photo.
Step 6. Starting 1 inch from fold, cut away rounding off both corners as shown in Step 6 photo.
Step 7. Cut a little triangle at the fold, when open will be a diamond.
Step 8. After you have done Steps 1 - 7 for Both sheets of copy paper, lay one on top of the other and staple all together. Staple once in center of fold line on either side of the diamond cut out as shown in Step 8 photo.
Next pull up the large pieces and staple together (use Elmers glue stick if you don't want staples showing, I was impatient to get it done so I stapled). You should end up with 4 of the large spokes with a narrow spoke inbetween.
Experiment with adding diamonds or use a hole or pattern punch to the narrow spokes
I decided the narrow spokes were a bit too long for my liking so I trimmed them back a little. I also like the look of double stapling the large spokes so that they come to an elongated flattened point instead of the more rounded end.
Just play around with it, do a little tugging and pinching and fluffing until it's just right.
You could also use a glittered paper or other embellishments.
Enjoy!
Warm Hugs,


Beautiful star, thanks for sharing how its done :)
ReplyDeleteWish you a great weekend!